How to take over the SAP S/4HANA system with access to OS only.

Ok, you are a newcomer SAP BASIS administrator, but you didn’t get any passwords from the previous SAP guy. Your target is to get access to SAP* in a certain client, but you only have access to the application and database server’s OS. The algorithm of overtaking is:
OS > SYSTEM@SYSTEMDB >SYSTEM@TENANTDB > SAPHANADB@TENANTDB > SAP*

  1. Taking over SYSTEM user of HANA SYSTEM DB:
    su – <hanadb user>
    HDB stop
    hdbenv.sh
    hdbnameserver -resetUserSystem
    sapcontrol -nr $TINSTANCE -function StartSystem HDB

  2. Taking over SYSTEM user of HANA TENANT DB:
    As SYSTEM@SYSTEMDB:
    ALTER SYSTEM STOP DATABASE <TENANTDB>
    ALTER DATABASE <TENANTDB> SYSTEM USER PASSWORD "MY_NEW_PASSWORD";
    ALTER SYSTEM START DATABASE <TENANTDB>

  3. Taking over SAPHANADB user in HANA TENANT DB:
    As SYSTEM@TENANTDB:
    ALTER USER SAPHANADB password "MY_NEW_PASSWORD" NO FORCE_FIRST_PASSWORD_CHANGE;

    Changing the password in hdbuserstore of application server:
    su – <application server user>
    hdbuserstore -i SET DEFAULT <sap-hanadb-hostname>:3<instance>13@<TENANTDB> SAPHANADB

    Unlock and reset connect attempts count:
    As SYSTEM@TENANTDB:
    ALTER USER SAPHANADB1 RESET CONNECT ATTEMPTS;
    ALTER USER SAPHANADB1 ACTIVATE USER NOW;


    Checking:
    su – <application server user>
    hdbsql -U DEFAULT

    SQL>
    SELECT * FROM T000;


  4. Taking over SAP* in the client:
    su – <application server user>
    Check for the parameter login/no_automatic_user_sapstar = 0 in the SAP application server’s profiles.

    As SAPHANADB@TENANTDB:

    Check and remove the created SAP* user to remove its override:
    select * from USR02 where MANDT = <MANDT> and BNAME=’SAP*’;
    delete from USR02 where MANDT = <MANDT> and BNAME=’SAP*’;

    Login with SAP* user and default password “pass”.
    Do not forget to bring it all back!

Migration of SAP BO SQL AnyWhere database to HANA

I encountered strange behavior of the database (or maybe I just need to know how to prepare them), so I migrated to HANA. 


Baseline:

  • Create a tenant in the database (example HBQ)
  • Find out the tenant’s SQL port. To do this, log in to some HANA STUDIO in this tenant and execute the query: 
    SELECT SERVICE_NAME, PORT, SQL_PORT, (PORT + 2) HTTP_PORT FROM SYS.M_SERVICES WHERE (SERVICE_NAME=’indexserver’ and COORDINATOR_TYPE= ‘MASTER’)
  • Create an entry in your ODBC.INI:
    vi /home/boqadm/.odbc.ini
    And also on:
    vi /usr/sap/BO/sap_bobj/enterprise_xi40/odbc.ini

    Why is this so? Good question, it turned out that for some reason it doesn’t work without .odbc.ini in the user’s home folder, perhaps environment variables or something else, in general, in your odbc.ini.

    An example entry, here we use the port obtained from the sql query:
    [HBQ] driver=/home/boqadm/sap/hdbclient/libodbcHDB.so servernode=sap-qas-db:30144 databasename=HBQ description=HBQ
  • Check connection:
    isql -v HBQ SYSTEM mypass
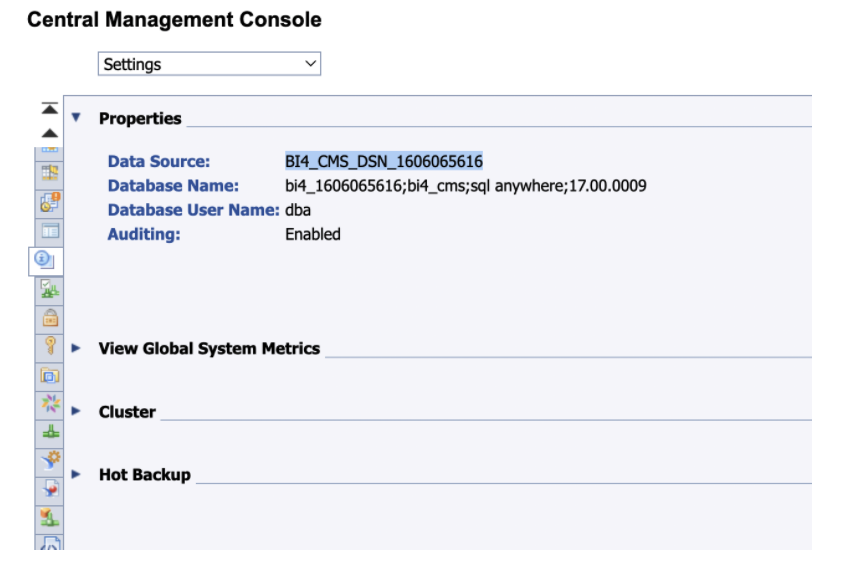
  • Find out and write down your Data Source name in a notepad from CMC> Settings:
  • Find out and write down the Node Name in a notebook:
    cat /usr/sap/BO/sap_bobj/ccm.config | grep SIANODENAME
  • Find out or remember your CLUSTER KEY
  • Run cmsdbsetup.sh from /sap_bobj
  • Enter the node name
  • Enter YES to continue
  • Enter COPY
  • We are asked if the current base is a receiver, we say no
  • Select the receiver type (HANA database)
  • Enter the DSN of the receiver (HANA database), HBQ in our case
  • Enter the user and password (HANA database)
  • Select the source database type (SQL Anywhere)
  • Enter the DSN of the source database (SQL Anywhere)
  • Enter the user and password (SQL Anywhere). LOGIN WILL BE **DBA** big!
  • Enter CLUSTER KEY
  • Copying will begin. The switch to the new base will happen automatically. You can check that the tables have appeared in the tenant. After this, for the sake of completeness of the experiment, I comment out the old DSNs in odbc.ini and reboot the system. Next, by going back to CMC> Settings, we will see that the database has become HANA. Note 1768842 will help.

Using NIPING

Server side:
niping -s -I 0

Client side:

Measuring throughput
niping -c -H <nipingsvr> -B 100000

Measuring RTT
niping -c -H <nipingsvr> -B 1 -L 100

Long LAN stability test:
niping -c -H <nipingsvr> -B 10000 -D 100 -L 360000

Long WAN test (stability):
niping -c -H <nipingsvr> -B 200 -D 1000 -L 36000

Long WAN test (idle timeouts):
niping -c -H <nipingsvr> -P -D 3600000

Short throughput/stability test:
niping -c -H <nipingsvr> -B 1000000 -L 100

MTU test:
niping -c -H <nipingsvr> -B <nnn>

Vary <nnn> according to these values: 500, 1000, 1400, 1500, 4000, 10000 and 40000

Setting up an SNC tunnel for SAPRouter

Let’s say you need to configure SAPRouter with SNC for remote users, for example, people from another office.

Download and unpack saprouter (sapcar -xvf) and the crypto library to, for example, C:\saprouter.

Let’s write the environment variables (example):

SECUDIR=C:\sapouter

SNC_LIB=C:\saprouter\nt-x86_64\sapcrypto.dll

Next, we will create certificates and exchange them:
Attention, names are CASE SENSITIVE ! CN in this case is the HOST NAME (it also works using a short name, without a domain). However, CN can be anything and does not coincide with the machine name, but is used for ease of understanding.
Initiator’s side:

sapgenpse get_pse -v -noreq -p local.pse “CN=spb-initiator”
sapgenpse seclogin -p local.pse
sapgenpse export_own_cert -o spb-initiator.cer -p local.pse

Acceptor side:

sapgenpse get_pse -v -noreq -p local.pse “CN=msk-acceptor”
sapgenpse seclogin -p local.pse
sapgenpse export_own_cert -o msk-acceptor.cer -p local.pse

Let’s exchange certificates and write them to the directory C:\saprouter\nt-x86_64

On the initiator side we will place the file  msk-acceptor.cer ,  on the acceptor side we will place the file  spb-initiator.cer

Let’s execute the command on the initiator’s side:

sapgenpse maintain_pk -a msk-acceptor.cer -p local.pse

And on the acceptor side:

sapgenpse maintain_pk -a spb-initiator.cer -p local.pse

saproutetab settings:

Initiator:

# Allow Outbound connections to SAProuter host2 will use SNC
KT “p:CN=msk-acceptor” <acceptor IP> 3299

# Allow all inbound connections
P * * *

Acceptor:

# accept incoming connections from SAProuter1
# with destination sapdp00 and 3298 on any host
KP “p:CN=spb-initiator” * sapdp00
KP “p:CN=spb-initiator” * 3298

Starting saprouter:

Initiator:

Saprouter -r -K p:CN=spb-initiator

Acceptor:

Saprouter -r -K p:CN=msk-acceptor

String SAPROUTER in SAP GUI:

/H/<IP of the initiator>/H/<IP of the acceptor>/H/

Check: 

Initiator:

niping -c -H /H/<IP of the initiator>/S/3299/H/<IP of the acceptor>/S/3299/H/<IP of the acceptor>

Acceptor:

niping -s

We receive a message like:

connect to server o.k.
send and receive 10 messages (len 1000)

——- times —–
avg 12.900 ms
max 13.548 ms
min 12.631 ms
tr 151.405 kB/s
excluding max and min:
av2 12.853 ms
tr2 151.963 kB/s

If not, read the file dev_rout. If the program complains about SNC, you have confused something with the certificates, most likely you have confused the initiator, acceptor and who is waiting for which certificate.

If it complains about route permition denied, check saproutetab, apparently you specified the wrong IP. Perhaps the sapdp00 port is not described in c:\windows\system32\drivers\etc\services .

Saprouters can be combined; the most common topology is a star: one acceptor and many initiators.

Problem: a person from the region comes on a business trip with the saprouter line written to the central office. Because of this line here, he begins to walk in a loop to his region and back here.

Solution: create another guest saprouter. In DNS, name the host everywhere in the regions, for example, saprouter. A guest saprouter is also called a saprouter. That. an employee in his home region and on a business trip will go through support providers, only in one case through the region-central office channel, in the other – between two local support providers of the central office.

SCN Instruction:

http://wiki.scn.sap.com/wiki/display/Basis/How+to+setup+SNC+connection+between+SAProuters