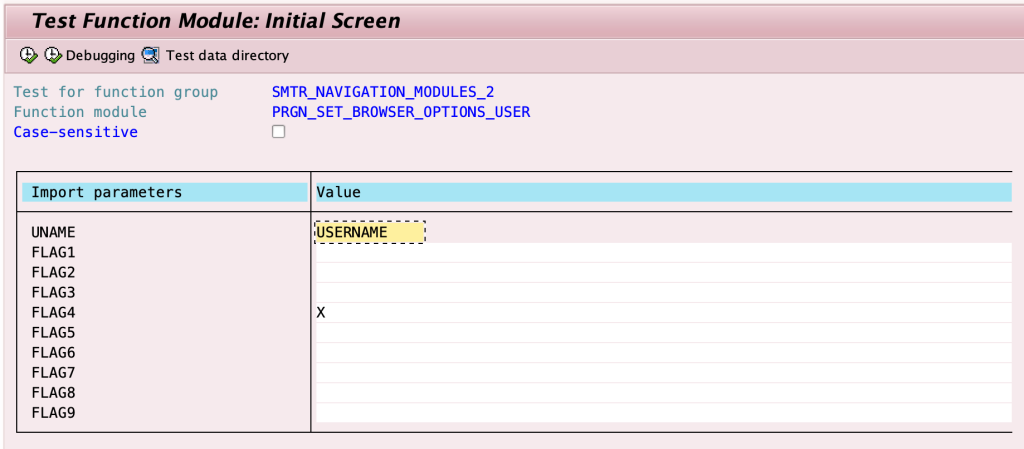
You can change this setting by using the followin FM:
PRGN_SET_BROWSER_OPTIONS_USER

UNAME – User name
FLAG4 is responsible for this checkbox

You can change this setting by using the followin FM:
PRGN_SET_BROWSER_OPTIONS_USER

UNAME – User name
FLAG4 is responsible for this checkbox

You would like to make a system refresh from production to a quality assurance system. But after this refresh, you will have to reconfigure some things back. For example, the state of SLICENSE, SM59, WE20, WE21, BD64 transactions.
Here is an example of how to put SM59 data into a transport request and import it after the system refresh is finished.
Here is a catalog structure:

export_sm59.sh:R3trans -w /usr/sap/trans/EXPORT/SM59/LOG/EXPORT_SM59.log /usr/sap/trans/EXPORT/SM59/R3T/export_sm59.r3t
export_sm59.r3t:
Export
file '/usr/sap/trans/EXPORT/SM59/DUMP/SM59.DMP'
delete from rfcattrib
select * from rfcattrib
delete from rfcdes
select * from rfcdes
delete from rfcdoc
select * from rfcdoc
delete from rfccheck
select * from rfccheck
import_sm59.sh:
R3trans -w /usr/sap/trans/EXPORT/SM59/LOG/IMPORT_SM59.log /usr/sap/trans/EXPORT/SM59/R3T/import_sm59.r3t
import_sm59.r3t:
import file = '/usr/sap/trans/EXPORT/SM59/DUMP/SM59.DMP'
So you need to run :
Please note that in this case SM59 data will be rewritten, but not added.
In addition, this command doesn’t mean that it will remove any data from the tables, it’s related to the created transport request:delete from rfcattrib
select * from rfcattrib
It was tested with all mentioned transactions above, the main question is which tables should be used? =)
Transactions:
To Upload files from Presentation Server to Application Server:
CG3Y
To Download files from Application Server to Presentation Server:
CG3Z
There is an analogue in the form of FM:
To Upload files from Presentation Server to Application Server:
ARCHIVFILE_CLIENT_TO_SERVER
To Download files from Application Server to Presentation Server:
ARCHIVFILE_SERVER_TO_CLIENT
You can change the starting transaction for everyone/certain users with a report:ADMIN_SET_START_TRANSACTION_FO
Example for a system named S4D:
SAPCAR -xvf "./SAPEXE.SAR" -R /mnt/DISTR/SAP_KERNEL/777.500/EXTRACTED/ SAPCAR -xvf "./SAPEXEDB.SAR" -R /mnt/DISTR/SAP_KERNEL/777.500/EXTRACTED/
yes | cp -rfp /mnt/DISTR/SAP_KERNEL/777.500/EXTRACTED/* /usr/sap/S4D/SYS/exe/uc/linuxx86_64//usr/sap/S4D/D00/exe/saproot.sh S4Dsu - s4dadm -c "sapcontrol -nr 00 -function RestartSystem"
su - s4dadm -c "sapcontrol -nr 00 -function GetVersionInfo"SELECT LAST_INVALID_CONNECT_ATTEMPT, INVALID_CONNECT_ATTEMPTS, USER_DEACTIVATED, LAST_PASSWORD_CHANGE_TIME,PASSWORD_CHANGE_NEEDED, VALID_FROM, VALID_UNTIL FROM USERS WHERE USER_NAME = 'MY_USER';Ok, you are a newcomer SAP BASIS administrator, but you didn’t get any passwords from the previous SAP guy. Your target is to get access to SAP* in a certain client, but you only have access to the application and database server’s OS. The algorithm of overtaking is:
OS > SYSTEM@SYSTEMDB >SYSTEM@TENANTDB > SAPHANADB@TENANTDB > SAP*
HDB stop
hdbenv.sh
hdbnameserver -resetUserSystem
sapcontrol -nr $TINSTANCE -function StartSystem HDBALTER SYSTEM STOP DATABASE <TENANTDB>
ALTER DATABASE <TENANTDB> SYSTEM USER PASSWORD "MY_NEW_PASSWORD";
ALTER SYSTEM START DATABASE <TENANTDB>ALTER USER SAPHANADB password "MY_NEW_PASSWORD" NO FORCE_FIRST_PASSWORD_CHANGE;hdbuserstore -i SET DEFAULT <sap-hanadb-hostname>:3<instance>13@<TENANTDB> SAPHANADBALTER USER SAPHANADB1 RESET CONNECT ATTEMPTS;
ALTER USER SAPHANADB1 ACTIVATE USER NOW;I encountered strange behavior of the database (or maybe I just need to know how to prepare them), so I migrated to HANA.
Baseline:
